> For the complete documentation index, see [llms.txt](https://s-organization-887.gitbook.io/hostyle-web/llms.txt). Markdown versions of documentation pages are available by appending `.md` to page URLs; this page is available as [Markdown](https://s-organization-887.gitbook.io/hostyle-web/wordpress/editor.md).
# 1단계 - Wordpress 설치
## 시작하기 전.
**서비스 결제까지 완료되었다면, 웹서버는 자동으로 셋팅되었습니다.**
**이제 홈페이지 디자인 플랫폼 (Wordpress)를 설치 및 셋팅하는 단계입니다.**
**만약 별도 WordPress 솔루션을 사용하지않고 자체 구축한 html 또는 php 파일이 있다면 하단 링크를**
**눌러서 자체구축 셋팅을 진행해주시길 바랍니다.**
### 1. Wordpress 설치 시작
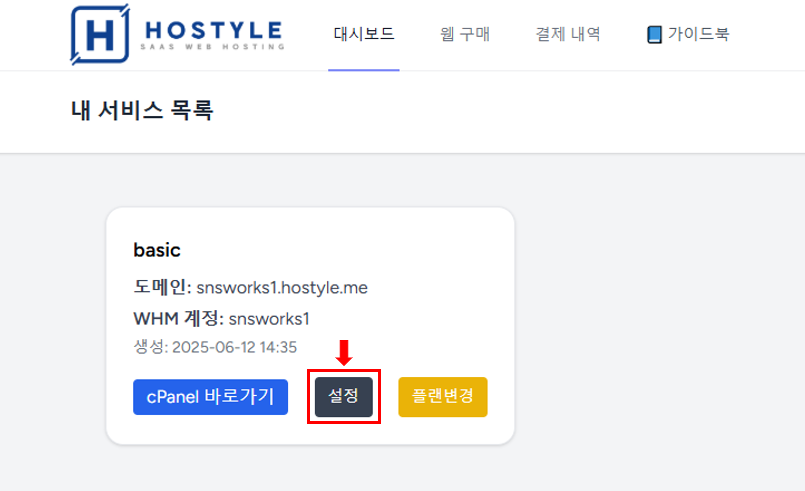
* 대시보드 -> 셋팅할 서버 설정버튼 클릭
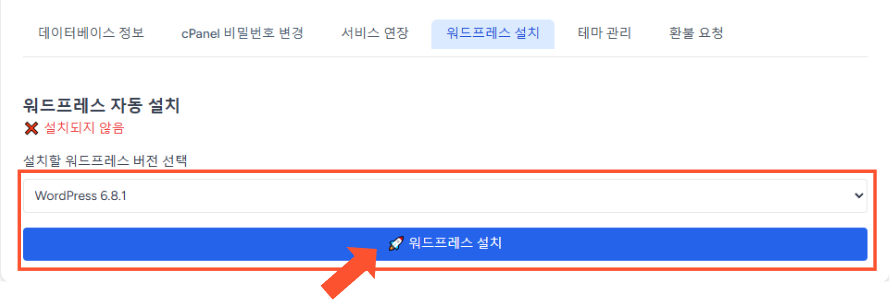
### 2. Wordpress 설치
{% hint style="info" %}
* DB 이름/유저/비밀번호 는 워드프레스 설치 후 셋팅에서 필요한 항목입니다.\
(DB 비밀번호는 서버 구매시 3단계에서 WHM계정정보 및 패스워드 입력란에 입력된 패스워드 입니다.)
* WordPress 버전을 선택하여 설치해주세요. 최신버전은 항시 업데이트 됩니다.\
(설치 후 WordPress 관리자 페이지에서 별도 업데이트 가능)
* WordPress 설치 후 삭제버튼 누를 시 웹폴더에 있는 모든 파일 / 데이터베이스가 초기화 됩니다. \
꼭!!! 삭제 전 백업해주세요.
{% endhint %}
### 3. Wordpress 설치완료
> 여기까지 Wordpress 설치가 완료 되었습니다.
>
> 다음 단계에서는 Wordpress를 셋팅 하는 단계입니다.